I feel a bit silly because I've had Adobe's Creative Suite 2 for more than two years, but I've only just discovered the HDR capabilities built into Photoshop CS2.
Most digital photos that we see use three bytes to store each pixel: one byte each for Red, Green, Blue. This is known as 8-bit colour because each colour is represented by 8 bits (one byte).
Many digital cameras and scanners are now capable of providing 16-bit colour: two bytes per colour, or six bytes per pixel.
HDR (High Dynamic Range) consists of 32-bit colour: four bytes per colour, twelve bytes per pixel. Furthermore, the four bytes are used to store a floating-point number, which means that an unlimited range of light intensities can be represented.
This is a nice idea, but cameras and scanners don't yet produce HDR, nor can monitors or printers display it adequately. However, human ingenuity has found ways to make use of it nevertheless.
An HDR image can be created by taking multiple exposures of the same scene using a range of different shutter speeds; Photoshop CS2 (or various other programs) can combine the different exposures into one HDR image.
Photoshop CS2 (or various other programs) can then take this HDR image and reduce it down to a normal 8-bit or 16-bit image, suitable for display or printing, using a clever algorithm to adjust the lighting optimally in each part of the image. This can produce pleasing and sometimes rather strange and uncanny results. To see examples, go to Flickr and search for "HDR". I suggest you then click Most interesting.
Taking multiple exposures is rather a nuisance: you need a good tripod, and if anything moves in the scene you will get blurring or ghosting. Fortunately, the clever algorithm used for HDR can also be applied (with somewhat inferior but still useful results) to a normal 16-bit image. In Photoshop CS2, just convert the image from 16-bit to 32-bit, and then convert it back to 16-bit again using the Local Adaptation option. You'll probably need to display the histogram and make some manual adjustment to get a good result.
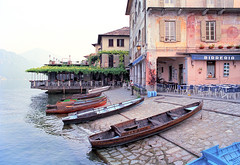
Here's an example of a 14-bit scanned negative with Local Adaptation, which (as I understand it) tries to give all parts of the photo a similar level of brightness. I added 15% contrast afterwards to give a more natural effect.
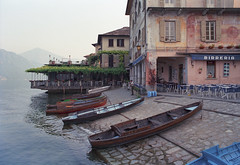
Here, for comparison, is the scanned negative without modification:
You might think you could achieve the same effect just by fiddling with the brightness, contrast, etc., but I tried and I couldn't.

No comments:
Post a Comment